I’ve been working on a Let’s Play of Baldur’s Gate for a while now, and there’s a feature I’ve always wanted to add to the site to make the dialogue pop a bit more. Just like it is in the game, I wanted to have each character’s name use a different colour so it’s easier to tell at a glance who’s talking.
The Goal
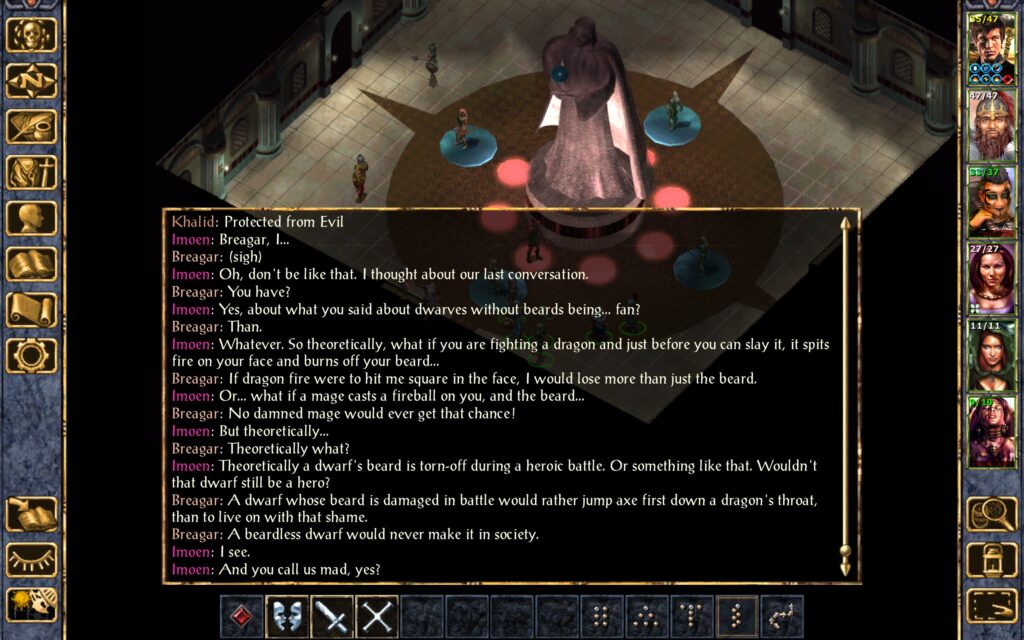
In Baldur’s Gate, when you read dialogue, every character has a unique colour. As an example, here’s some dialogue between Imoen and Breagar. You can tell who is speaking just by looking at the colour of their name.

I wanted to add a taste of this to my Let’s Play, but never got around to it. A few weeks ago I finally decided to implement the feature. I wanted to have a different colour for every name whenever I was writing dialogue. In order to do this I set myself some requirements:
- The colour should be based on the name, and be the same every time.
- There should be 16 colours, to match the Commodore 64 palette.
- I don’t want to have to manually set classes or use inline CSS every time I write out dialogue.
In order to implement this I knew I could base the colours on a string hash of the name. I could also detect names in dialogue segments by looking for <strong> elements that ended with a colon (:).
Implementation
CSS isn’t capable of altering the colour of an element based on its contents, so I opted to use Javascript instead. I modified my functions.php to attach the script at the end of every page and post. Here’s the full script I came up with for reference. I’ll go through it line by line in a moment.
/**
 * Add colors to dialogue in Baldur's Gate posts.
 */
function bok_add_dialogue_colours() {
    ?>
    <script>
        (function() {
            document.addEventListener('DOMContentLoaded', () => {
                const colorPalette = [
                    "#333",     // 0: Dark Grey (default)
                    "#800",     // 1: Red
                    "#808080",  // 2: Grey
                    "#777",     // 3: Medium Grey
                    "#4fb300",  // 4: Light Green
                    "#000",     // 5: Black
                    "#7f401a",  // 6: Orange
                    "#0C5",     // 7: Green
                    "#640",     // 8: Brown
                    "#9f9f14",  // 9: Yellow
                    "#6b1d6b",  // 10: Purple
                    "#bb0000",  // 11: Light Red
                    "#5d5d5d",  // 12: Light Grey
                    "#00A",     // 13: Blue
                    "#08F",     // 14: Light Blue
                    "#00d4aa"   // 15: Cyan
                ];

                const paletteLength = colorPalette.length;

                // Simple but effective hash function
                const generateHash = (str) => {
                    let hash = 0;

                    // Trim string for consistent hashing
                    const text = str.trim();

                    for (const char of text) {
                        hash = ((hash << 5) - hash) + char.charCodeAt(0);
                        hash |= 0; // Convert to 32-bit integer
                    }

                    return hash;
                };

                // Apply to all <strong> elements
                document.querySelectorAll('strong').forEach(el => {
                    const textContent = el.textContent.trim();

                    // Only apply to text that contains colon, indicative of dialogue "Speaker: line"
                    if (!textContent.includes(':')) return;

                    // Skip if the element already has a custom 'data-dialogue-colour' attribute to prevent recoloring
                    if (el.hasAttribute('data-dialogue-colour')) return;

                    const hash = generateHash(textContent);
                    const colorIndex = Math.abs(hash % paletteLength);
                    const color = colorPalette[colorIndex];

                    el.style.color = color;
                    el.setAttribute('data-dialogue-colour', color);  // mark processed
                });
            });
        })();
    </script>
    <?php
}

add_action('wp_footer', 'bok_add_dialogue_colours');
First, I use an event listener so the code runs on a DOMContentLoaded event. This means that the script will wait for the entire DOM1 to load before it runs, guaranteeing that the script will process all the HTML.
    <script>
        (function() {
            document.addEventListener('DOMContentLoaded', () => {
                // Code to run goes here.
            });
        })();
    </script>
Next I have a list of colours based on the Commodore 64 palette. While I tried to stick to the basic colours, I used darker versions of some of the brighter colours so that they would still be easy to read. I also cache the length of the colour palette for use later in the code.
                const colorPalette = [
                    "#333",     // 0: Dark Grey (default)
                    "#800",     // 1: Red
                    "#808080",  // 2: Grey
                    "#777",     // 3: Medium Grey
                    "#4fb300",  // 4: Light Green
                    "#000",     // 5: Black
                    "#7f401a",  // 6: Orange
                    "#0C5",     // 7: Green
                    "#640",     // 8: Brown
                    "#9f9f14",  // 9: Yellow
                    "#6b1d6b",  // 10: Purple
                    "#bb0000",  // 11: Light Red
                    "#5d5d5d",  // 12: Light Grey
                    "#00A",     // 13: Blue
                    "#08F",     // 14: Light Blue
                    "#00d4aa"   // 15: Cyan
                ];

                const paletteLength = colorPalette.length;
You might think the order looks a bit random, but the order is so that certain characters will use specific colours. I ran some tests when the code was finished and reordered these so specific characters would use specific colours (e.g. Imoen use purple and Xzar uses green). It’s not perfect, but adds a touch of flavour.
Next I create a simple hash function. This is used to generate a number based on the string. This number is deterministic, meaning it will be the same number with the same string every time.
                // Simple but effective hash function
                const generateHash = (str) => {
                    let hash = 0;

                    // Trim string for consistent hashing
                    const text = str.trim();

                    for (const char of text) {
                        hash = ((hash << 5) - hash) + char.charCodeAt(0);
                        hash |= 0; // Convert to 32-bit integer
                    }

                    return hash;
                };
It’s important to note the call to str.trim() here. Depending on how I’ve written an article, it’s possible the text within the element has an extra space. “Imoen:” and “Imoen: ” (extra space) are two different strings that will generate different hashes. This leads to them being highlighted to different colours.
I could ensure that I don’t include an extra space every time I write dialogue, but I’m a programmer and I’m lazy. By using trim() I ensure that there is no extra whitespace every time and that it generates the same hash.
Next, I use a query selector to select all <strong> elements in the DOM, and filter out only those that have a colon within.
                // Apply to all <strong> elements
                document.querySelectorAll('strong').forEach(el => {
                    const textContent = el.textContent.trim();

                    // Only apply to text that contains colon, indicative of dialogue "Speaker: line"
                    if (!textContent.includes(':')) return;

                    // Apply colour
                });
Finally, I apply the colour by generating a hash and using a modulus to select an element from the array of colours. I apply a data-dialogue-colour attribute when this is done so that we don’t repeat the operation for any elements. This also provides a way of overriding the colour, should we feel the need to.
                    // Skip if the element already has a custom 'data-dialogue-colour' attribute to prevent recoloring
                    if (el.hasAttribute('data-dialogue-colour')) return;

                    const hash = generateHash(textContent);
                    const colorIndex = Math.abs(hash % paletteLength);
                    const color = colorPalette[colorIndex];

                    el.style.color = color;
                    el.setAttribute('data-dialogue-colour', color);  // mark processed
To bring it all together, I add this script to the bottom of every page using WordPress’ add_action() method.
add_action('wp_footer', 'bok_add_dialogue_colours');
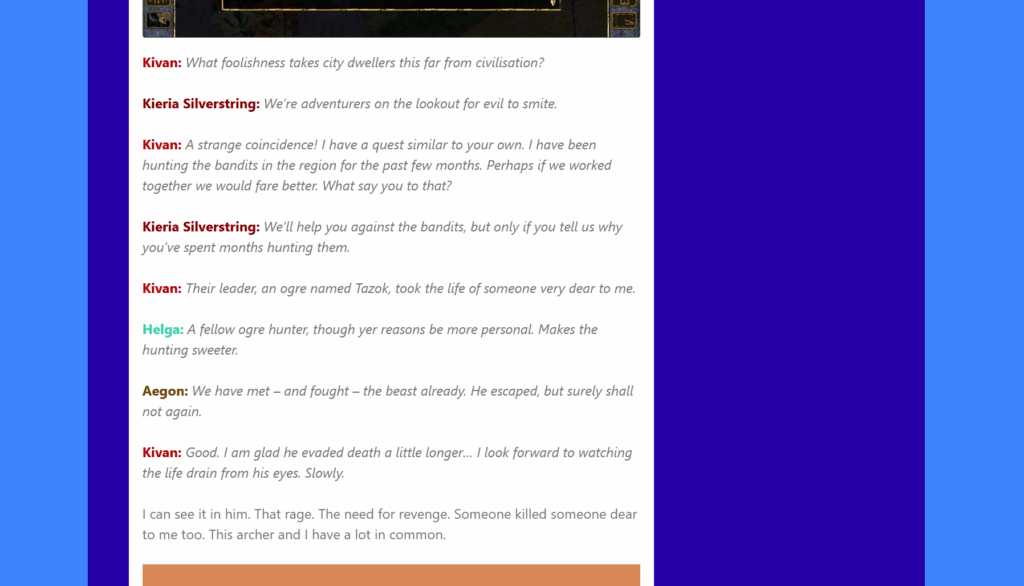
Now, when you see dialogue in the Let’s Play, each character is highlighted with a different colour.

It’s a cool little touch that gives the article a little flair.
Side Effects
When writing this article I forgot that there were some other areas where I used strong elements with colons. So there are some other pages that end up with a bit more colour, such as the Playing My Steam Library page:

But… I kinda like it. So I’ve decided that this isn’t a bug, it’s a feature. And I’m keeping it that way.
- Document Object Model. In layman’s terms, the entire HTML page. ↩︎


